


Set up GitOps based auto deployment with ArgoCD
Weekly Nano Project 2 - Setting up Automated Continuous Deployments to Kubernetes based Staging and Prod Environments with ArgoCD

Namaste Builders,
Welcome to the weekly Nano Project series. You’ve heard of CI/CD ? While most people consider it as just one practice this is a clear difference between the two that RealOps Builders can tell. Continuous Integration is about making sure your code is well tested, packaged and ready for the deployment. Whereas Continuous Delivery/Deployment is the process which will actually take that package and deploy on a continuous basis, most commonly to Kubernetes environments. Thats what you are going to learn with this week’s project.
This week we are building automated continuous delivery (CD) with the most popular of GitOps Based tools i.e. ArgoCD. So lets get started building.
Pre requisites
kubectl client installed along with Docker Runtime (Docker Desktop or Rancher Desktop)
Working Kubernetes Cluster. Use these instructions to setup Kubernetes Environment with KIND.
Git installed along with a Terminal (iterm, powershell etc. )
Fork and clone the project repo: https://github.com/sfd-cicd/vote-deploy
This project is from one of the courses at School of Devops. You could build mastery on complete Argo Suite by enrolling into Ultimate Argo Bootcamp by School of Devops.
Setup ArgoCD
Install ArgoCD on a working kubernetes environment as,
kubectl create namespace argocd

kubectl apply -n argocd -f https://raw.githubusercontent.com/argoproj/argo-cd/stable/manifests/install.yaml
Reset admin password to password
# bcrypt(password)=$2a$10$rRyBsGSHK6.uc8fntPwVIuLVHgsAhAX7TcdrqW/RADU0uh7CaChLa
kubectl -n argocd patch secret argocd-secret \
  -p '{"stringData": {
    "admin.password": "$2a$10$rRyBsGSHK6.uc8fntPwVIuLVHgsAhAX7TcdrqW/RADU0uh7CaChLa",
    "admin.passwordMtime": "'$(date +%FT%T%Z)'"
  }}'
Source: reset-argo-password.sh Reference: argo-cd/faq.md at master · argoproj/argo-cd · GitHub
kubectl get all -n argocd
kubectl patch svc argocd-server -n argocd --patch \
  '{"spec": { "type": "NodePort", "ports": [ { "nodePort": 30200, "port": 443, "protocol": "TCP", "targetPort": 8080 } ] } }'
source: patch_argo_svc.sh
kubectl get svc -n argocd
Find out the IP address for one of the nodes. One way to do so is to run the following command,
kubectl get nodes -o wide
Note IP address for one of the nodes and browse to
https://NODEIP:30200
replace NODEIP with the actual
You should be presented with the login page for ArgoCD as follows

username =.
adminpassword =
password
Once logged in, you should see a screen such as the following screenshot

Setup Deployment Repository
Create a fork of sfd-cicd/vote-deploy: Kubernetes Deployment Code for Vote App
While creating the fork, ensure that you uncheck the Copy the main branch only option as shown in screenshot below.

Ensure you have main and release branches available. If you do not have the release branch, create it from main.

Review the code created with kustomization overlay configured for staging and prod environments in additional to the base manifests.
Setup Staging and Prod Deployments with ArgoCD
Create namespaces mapping staging and prod environments as,
kubectl create ns staging
kubectl create ns prod

kubectl get ns
Browse to ArgoCD web console and click on Create Application

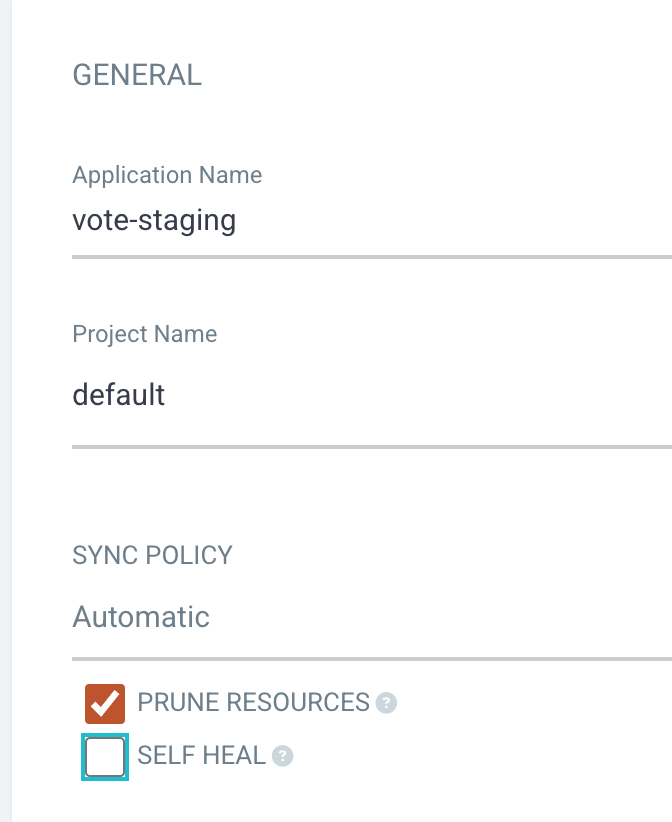
From General ,
Application Name :
vote-stagingProject : default
Sync Policy :
AutomaticPrune Resources Checked
From Source,
Repository URL :
Your Repo URL (https)Revision : main
Path :
staging

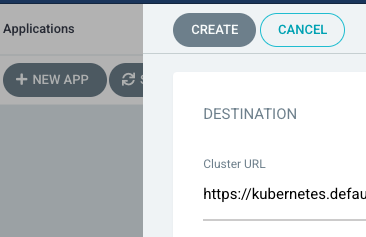
From Destination,
Cluster URL :
https://kubernetes.default.svc
(default)
Namespace :
staging

Click on CREATE button on the top
Set up Deploy to Prod Configuration
Create another application, repeat the same configurations with the following changes,
Cluster URL :
https://kubernetes.default.svc
(default)
Application Name :
vote-prodRevision :
release(will deploy from release branch)Path :
prodNamespace :
prod

Once created, you should see two applications configured on ArgoCD tracking two environments.
Deployments in Action
Open two terminals and start watching for changes in the staging namespace
Terminal 1
watch kubectl get all -n staging
Terminal 2
watch kubectl get all -n prod
Watch for the changes in the console as well as on Argo. You shall see the application synced from the Git Repo to the Kubernetes Cluster in a few seconds.
Staging

Prod

Validate by accessing the vote apps on
Staging :
http://NODEIP:30300
Prod :
http://NODEIP:30400
e.g.

Exercises
Set up branch protection rule to lock down
releasebranch and allow changes via pull requests. You can experiment by adding additional policies as well.Try modifying YAML manifests in Deploy Repo in Git in main branch b
y changing the image tag in
base/deployment.yamland wait for the staging deployment. Then raise the pull request to merge it into release and see it deployed to prod.
Master GiOps with ArgoCD
Argo CD is one of the four tools which are part of the Argo Suite of tools which includes
Argo Rollouts : Implement Blue/Green and Canary Releases with automated Failovers, integrated with monitoring system such as Prometheus and Grafana.
ArgoCD : Setup automated syncing and Continuous Delivery to Kubernetes using principles of GitOps
Argo Workflow : Setup DAG (Directed Acyclical Graph) based workflows to automate CI, Machine Learning Pipelines, AI Workflows and more.
Argo Events : Provide a way to automatically trigger workflows based on the Events.
If you want to build Real World skills on all of above by taking a project based approach, you could enrol into Ultimate Argo Bootcamp by School of Devops, a high quality course authored by Gourav Shah, a leading corporate trainer and DevOps Educator.
This is also available as part of our comprehensive learning programs which you could start with by clicking on link below.